I've recovered from my initial shock on skimmers.
In 2003 I wanted to run away, there were
so many badly built ponds with skimmers and biofalls. More and more were
built, I bought the book and learned how they
were supposed to be built, and started rebuilding them, one at a time.
Lifting an 80 pound bag of wet lava rock out of one while standing on one
foot leaning into a hill is not a fun thing. If we find one with the old
giant bags, we order in new smaller bags, takes more of them, but saves
everyone from back surgery
Skimmers still kill fish, or pumps in the event of a leak, but there is a
right way and a wrong way to install them.
Their advantage - it's easy to get to the pump if there is a problem. It
also does give a place to put an autofill securely.
Pool filtration systems with a backwash feature,
labelled for ponds. Great if you have time to backwash them. And if they
are correctly plumbed so they don't lose prime. Expensive, and if you
don't have time to backwash them, serious problems develop fast. Make
maintenance easier but more necessary.
Electrical follies: An extension cord you can
see isn't that safe, but if the plug
is sheltered from rain, and above ground level, it beats some very
expensive and foolish things I've seen.
- Vertical facing non-gfci outlet below ground level. (and this was not
a cheap pond).
- A pond pump cord hard-wired to an extension cord with frayed
insulation under 300 to 500 pounds of rock.
- Cutting the cord off of the pump and hard-wiring it to an electrical
source where no outlet is available. I don't know why people do this,
but they do. Immediately voids the pump warranty - if you have a new
pump with a 3 or 5 year warranty, we assume you would like that to be
honored if the pump fails, with a free replacement if within warranty.
Cut that cord off, and you'll be paying for the new pump. It is often
cheaper to have an outlet installed, than to buy a new pump.
- Underground splices on outdoor wiring: guaranteed that sooner or later
water will get into the pipe, if the splice is in a pipe. Guaranteed
that a circuit will be tripped and stay tripped when this happens. If
the pond pump goes out, always check the electrical with another
household appliance, like a hair dryer, before buying a new pond pump.
The electrical is the problem at least 25% of the time.
- And then there's the super cautious electrician or homeowner, switched
outlets, switched outlets with the switch inside the house. But the
worst - switched inside the house, but the pump is hardwired to the
switch. Makes service on that pond REQUIRE the homeowner to be at home.
We answer emergency calls as quickly as possible. Often we can
tell you, by phone, what to do to temporarily
rescue your fish until we can get there. Everything Fishy's telephone
number is 817-293-1782. It is usually forwarded to my cell if we
are on a job site. Our hours
are essentially 9:00 a.m. to sundown during pond season. (March thru June)
If we're out on a job you will get voicemail.
Because cell phones are vulnerable to water damage, it can be a few
minutes before we get the message. We are based
in Fort Worth, Texas, and on annual maintenance we cover a pretty wide
area, including McKinney, Plano, Frisco,
The Colony, Denton, Weatherford. There is a mileage charge on visits over
30 miles from our base.
The Do It Yourself pond: Pond design tips to save
you time, money and grief.
Good filtration is critical to a healthy pond. Aeration helps to control
temperature in the summer and enhance
conditions for your fish, in addition to allowing many creative options in
the way your pond appears, and sounds.
The pleasant sound of trickling water, or the roar of a larger waterfall
can be arranged.
Bog and water plants enhance the ecosystem by using up nitrates. They
also soften and naturalize
the appearance of the pond. Water lilies bloom in the morning during the
summer months, and provide shade for the
fish during the heat of the day. We sell water lilies in several colors,
pickerel rush, aquatic iris, water cannas,
umbrella plants, parrots feather, and horsetail subject to availability.
We raise our own plants.
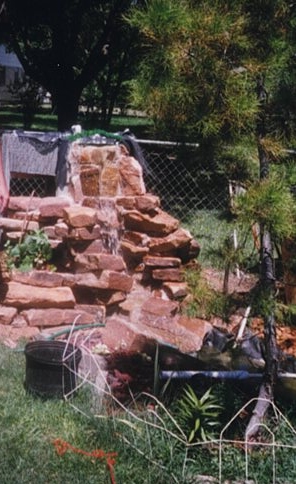
 Chief design flaw in this one: all
those white stones are limestone. Stringy tough, brilliant green hair
algae 3 to 4 ft long growing throughout it and rooting in the liner.
Filtration: Gravity flow Tetra Pond Filter. Hardware store pump, Beckett
or Little Giant
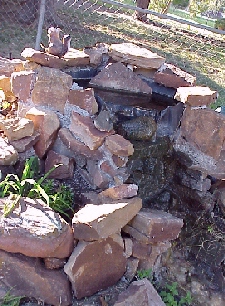
Chief design flaw in this one: all
those white stones are limestone. Stringy tough, brilliant green hair
algae 3 to 4 ft long growing throughout it and rooting in the liner.
Filtration: Gravity flow Tetra Pond Filter. Hardware store pump, Beckett
or Little Giant
Other problems: Green water fed by the ample supply of leaching
limestone. Cure for the green water and string algae: Everything Fishy's
Ultimate Stone Sealant, available on the pond
supply page. Requires draining the pond, powerwashing the stone, and
of course the fish have to be elsewhere for a day or two during sealing.
This relatively* non-toxic aqueous silicone solution penetrates the stone,
blot up all excess product after first coat. 2nd coat needs applied 2 to 3
hours later, followed by blotting of excess and a 24 hour dry cure time.
The second coat will bond with the penetrating first coat, and form an
impenetrable clear seal, no gloss, no discoloration of your stone or
mortar. UV resistant for about 2 years, then will require a re-coat,
followed by blotting of excess and a 24 hour dry cure time. We've tested
this product on several ponds with limestone, mortar, concrete and have
had beautiful results easily verified with a simple pond test kit. Test pH
and alkalinity in your pond and water supply to know if this is your
problem - both will be sky high on the pond, but not on the water source
if stonework, mortar or cinderblock is leaching. After sealant, both will
be around the same level as your water source.
* relatively non-toxic compared to other sealing products. If a drop or
two gets in the pond water the fish will not all die.
Large water flow volume in a very fast moving waterfall is NOT the only
answer if filtration is the goal. but with proper filter height, a good
flow helps.
Pond design services are available whether we build the
pond, or you do. Generally, we try not to build anything we wouldn't
want to service.
Good results require good quality materials. Everything
Fishy handles only 45 mil
liner on a per order basis. We handle only the best pumps, and we build a
few of our own filters. We also sell selected filters by major
manufacturers.
Pond Design Tips: Or how NOT to
build a pond. Experience is a marvelous, but expensive teacher.
April 1993
Rule 1: Bigger is better. Especially if you are going to
dig a hole in the ground, you want to map
the area and determine final size you will be happy with before you start.
Then call 811 or 1800 DigTess and have them look for buried electrical and
gas lines.
This may sound unnecessary, but one buried line can cause some really
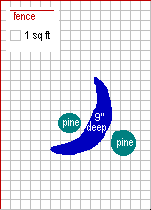
big problems. And on too small, let me share a story. My original pond,
(April 1993), was intended as a breeding area for toads, and home for one
betta. It measured around 84" from end to crescent end. It was positioned
between 2 young eldarica pines, which don't have a dense conical shape,
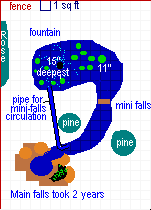
but grow airy and free-form in Texas. The red lines represent fence line.
Spring 1993, (or very early 1994), pre-pond. Twig fences to keep dogs out
of flowers and young pines.
My husband walked out the back door a couple of weeks after I dug it, and
said, "That's not a pond." By this time the ground had packed in well, the
dirt I had removed was distributed around the foundation, and it was too
late to go back to just grass between those trees. The evaporation rate
was so high I was adding water with dechlorinator twice a day. On July 4,
1995, my kids and I got home from the parade to find an ambitious man with
several shovels. The next phase of the pond was dug that day. The original
crescent became the runway for the waterfall he was going to build. The
liner for the main pond was an old waterbed mattress, since we were still
building. The following photos were taken in June 1996. The original basin
for the water fall was too high to be rocked in without several tons of
sandstone. Eventually the legs would be cut down and it would be lowered
to its current height. The area underneath was filled in with packed dirt.
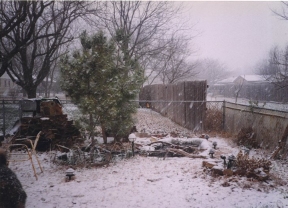
Winter 1994-1995
The runway from the falls to the main pond was lined with black pond
liner, 30 ml I think. We used a "waterproof" adhesive at the place where
the runway and pond liners overlapped by more than a foot. Waterproof
adhesives do break down. It leaked varying amounts for years until the
recent fiberglass cure. Sometime in 1994 or 1995 I added a climbing rose
along the fenceline behind the pond. The falls in fall of 1995 were a
framed wooden box elevated on stilts, lined with mortar to shape an oval
bowl, with dirt piled underneath the box and sandstone built around it.
There was no liner to extend up from the runway under the front stones
into the basin of the falls. There was liner within the basin itself, when
we discovered the mortar allowed too much seepage. (This is where we
discovered the second rule of pond and waterfall building. The liner
should be a single piece, uncut, from the top of the basin down the
runway and all the way across the pond.)
June 1995
June 1995
 Sandstone, concrete and mortar shift as they age. Leaks
develop and water ends up under the waterfall. Water under pressure leaks
more than standing water. A lot more.
Sandstone, concrete and mortar shift as they age. Leaks
develop and water ends up under the waterfall. Water under pressure leaks
more than standing water. A lot more.
Rule 3 of pond building:
Avoid limestone, concrete and mortar in contact with water. They break
down and feed tough algae. (We didn't break this rule, but the
contractors that build customer ponds keep doing it.)
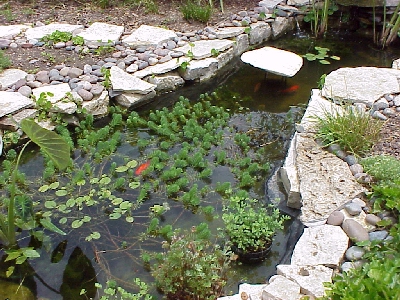
Spring 1996 photo: water lilies
May 1996 photo, last substantial changes in July 1995.
After the 4th of July enlargement and re-line, the pond held around 125
gallons. We kept gouramis in it because they could tolerate the heat of a
Texas summer with sporadic filtration. The cattails were added (not shown
on diagram above), followed by water lilies, to provide shade for the
fish. I added about 50 gallons of water a day to make up for evaporation
on sunny days. The blue and gold gouramis actually thrived on the heat and
got beautiful color from eating mosquitoes and larva. I still have some of
these fish. Of course I had to get in the pond and catch them before
winter arrived, and the one that got away didn't survive the first cold
snap. Gouramis are intelligent. The smartest one must have hidden in a
fold of the liner, because I drained the whole pond and didn't find him.
The pond stayed at 125 gallons and in this configuration for the 2 years
it took us to complete the main falls, working a weekend every 2 or 3
months, as we had time. We ran gouramis in the summer and goldfish in the
winter. The goldfish didn't adjust to leaving the pond as well as the
gouramis. I was all set to give them to the neighbor kids for fishbowls,
but one night in a fish bowl and they all died. I believe it was the shock
of leaving the dark hidden winter pond.
Photo: Our pond, summer 2000, before we started the next series of
revisions. After the enlargement and deepening we did in 1997 and 1998, we
could leave the goldfish in all year. Why not koi? Snack food for water
snakes and water birds should NOT be expensive. AND Koi eat plants, have
no growth regulating hormone, and outgrow the pond. The goldfish get quite
large, and do not eat the plants.
Pond and falls, Summer 2000

Front of falls, Autumn 1999
July 2000:
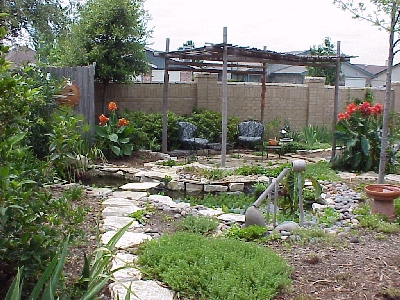
At this point it started to seem worth all the work. It isn't finished.
Eventually we will have covered all of the exposed black liner. Our pond
ends up in line behind our customers' ponds, which is appropriate. We are
laying a light gray flagstone over the area where the chairs are in this
photo, and an upper plant basin with a 2nd falls has been added in the
corner of the fence. (2 or 3 weekends pouring concrete walls before we
lined it and got water in it.) It is now full of plants, bog plants, young
bog plants, and young lilies. The 4 bullfrog tadpoles I bought this spring
have turned into at least 2 young bullfrogs who are quite amusing, and
will be quite loud one day I'm sure. But living in the city doesn't suit
us. Bullfrogs sound like country. New photos with the results are below.
To lay the flagstone we had to pull all of the sandstone at the edges off,
dig out the grass and dirt down about 2 inches, and level with sand. As a
consequence, the area around the pond looked pretty bad for a couple of
months.
Summer 2000 photo, falls from back, view into corner where plant basin
will go.

One last look before we started stripping off grass, and rock, and
removing edge plantings. Pond revisions can really wreck a back yard. Have
your outdoor social schedule cleared for at least a month if you have
large plans.
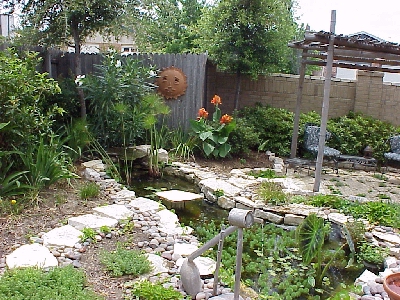
The falls in May 2001
Finally all of the leaks are sealed. A single piece of liner from top to
bottom wasn't an option without hiding stone work, so fiberglass has been
used to seal the entire water-bearing surface on the front of the falls.
We're
down to losing a half inch of water a day to evaporation, but this is May.
In July we will lose more to evaporation, but no more water under the
liner.
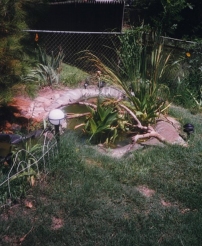
Stone work and upper plant basin, as of May 2001. There is a small falls
coming from the 150 gallon plant basin, down into the main pond. Stone
work in the walking and seating area is flagstone on a bed of playsand. On
the pond itself, this is all rough surface sandstone. The black liner is
gone on this side of the bridge, hidden by carefully installed sandstone.
(Behind the cattails, and around the plant basin, are still waiting for
more stone.)
The entire runway was sealed with fiberglass, where the dog toenails had
made tiny punctures in it. But the real leak was a pressurized crack in
the rock on the main falls. If liner had originally been built into the
design, behind the rock, this wouldn't have happened. But the Ponder's
Bible hadn't been written when we built the falls.
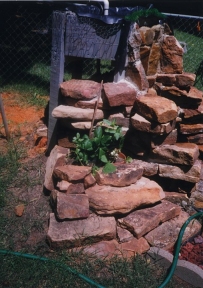
Upper Plant basin: concrete walls poured between plywood framing. No
bottom, lined with a 10x10 pond liner. It's bigger than it looks. Falls
into the pond splash over stone that rests atop 45 ml liner. Solid, loose,
unglued overlap. It doesn't leak.
 May
2001
May
2001
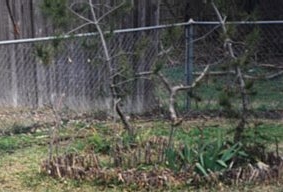
The pump is hidden, the pipe is hidden in the main pond now. Perennial
hardy plants are going in below the lonesome pines. The pines are now 10
ft tall. Compared to the 1995 and 1996 photos we scanned tonight, this
place has grown up.
Grass has just about disappeared from this corner of the landscape.Still
plucking a litttle out between the stones.
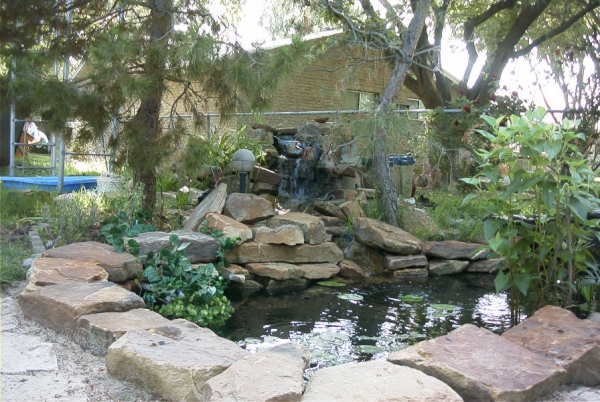
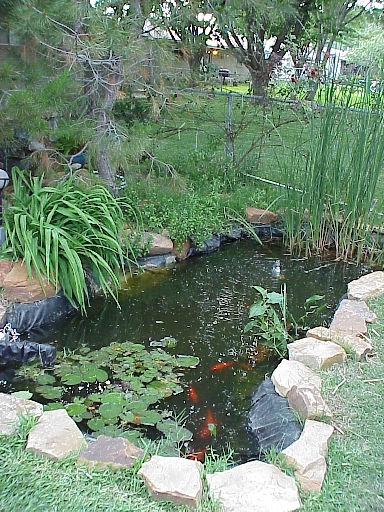
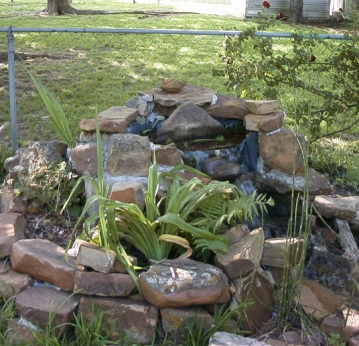
This is a customer's pond, but one of the most innovative
designs I've seen. (I see a lot that were built by pool builders and
general contractors with design flaws that cause dead fish and green
water.) The single biggest problem with this pond is the quantity of
limestone in contact with the water. Major infestations of long stringy,
tough, hair algae seem to occur in ponds with limestone or exposed
concrete. The difference between this algae species and several others
is its brilliant green color, it's strong, tough to break, and actually
roots to the rock. The best cure I've found is manual removal of the
algae plus Microbe Lift PL, although this product takes a while to work
when lime is present. For a clean, healthy pond and to eliminate future
outbreaks, all of the limestone or concrete that is feeding the algae
should be removed, or sealed with a safe sealant. (I'm not sure how well
aquarium silicone holds up to UV from sunlight. We've used marine grade
polyurethane but let it cure all winter before exposing the surface to
water.)
This pond was freshly scrubbed about a week before these photos were
taken. It was totally green, full of stringy algae rooted in the liner
prior to the cleanup.
2011 UPDATE - we found a cure for green
water and algae growth due to contact with concrete, limestone and mortar.
We use an aqueous silicone sealant (surfaces must be clean, pressure
washed first) See more details on the Algae page
or if you want to buy it and apply it yourself, check out the pond
supply page, scroll down to item 1435. You'll need to empty your
pond, pressure wash, and you will need a pump sprayer that has not been
used for pesticides. After 2 coats of sealant, with a couple of hours
between, let cure and dry for 24 hours.
Caulk any large cracks with a pure silicone caulk - no fungicides - AFTER
applying the sealant, or just foam the cracks, but I would
seal first. Order, email or call if you have any questions. We have had
great success with this.
|
1. Have a plan. Know where all pipes and buried cables are in
your yard.
2. Know where electricity for the pond will need to be, and where
it will need to come from. Most cities require
cable to be buried 12 inches below ground. Gray PVC around single
strand wires of the appropriate weight are the
easiest and safest to work with. Match the circuit breaker your
electrician will be adding to your outdoor requirements.
25 amp is generally OK for a pond pump and submersible lights. If
you plan on (or have) a pool or other large electrical
devices, talk to your electrician before doing anything. Once the
breaker is selected, match your wire to the breaker.
Your GFCI outlet should be mounted above ground and above possible
flood zones. Hidden behind a shrub is fine.
We generally dig the trench, run and connect the pipe, and run the
wire through it, then have an electrician complete
the installation.
3. Have the liner ready before you start digging. Just in case
mother nature sends a downpour.
4. We place the rim of the pond slightly above ground level
(about 4 inches). This prevents runoff from the
yard from ending up in the pond.
5. An overflow can be a fish saver. If too much rain falls, it's
nice if the fish are still in the pond in the
morning. It should be placed an inch or so below the absolute top
rim of the pond. A bit of pvc pipe or a fold
in the liner between 2 stones will do, on the downhill side if
your yard isn't 100% level.
6. Plumbing: The best place to match up the pieces is at the
hardware store. Fittings, hose, and pump all need
to connect correctly. We carry flexible non-kink hose on
Everything Fishy. Hose is generally measured by inside
diameter, and should fit very snugly over pump outputs or
fittings. Corrugated flex tubing cracks and breaks faster than
smooth vinyl flex tubing. Flex PVC (spa hose) requires pvc
fittings and should never be clamped. You'll need primer and blue
glue for it.
7. If you build a waterfall, put it at a corner of the liner so
the liner can extend up into it, under the rockwork.
This may prevent leakage problems due to rocks shifting, children,
dogs, etc. As long as the water gets back into
the pond everything else can be fixed.
8. Avoid glue-dependent situations. Buy a liner that is large
enough, rather than piecing 2 sections together.
It's more expensive at the beginning, but most submersible glues
do not hold up for more than a year or two.
9. Buy or build a good filter. A low flow gravity drain filter is
the easiest to work with, and often provides
the best clarity and water quality. It is also one of the least
expensive. Everything Fishy sells a kit. Cyprio
and Hagen make reasonably good filters. Identify a gravity drain
filter by its spraybar. Water comes in at the
top, and goes out thru the bottom. They do have to sit above water
level and cannot be used to drive a waterfall.
But they are less prone to pressure leaks and backups, and far
easier for a home-owner to maintain.
10. Buy a pump slightly larger than you think you need. Use a T
or Y fitting to divide some of the flow off
for circulation, a fountain or a falls Use a PVC or other good
ball valve to control the flow going into the filter,
and elsewhere.
That's a start. Mistakes, ours, and some we've seen, are listed
below. There are many ways to put together a
beautiful pond to enjoy. Ours are custom-designed to a large
extent, to suit our customers' requirements. But the
tips above are always taken into account.
We made a lot of mistakes building our first pond (in our back
yard) in 1995. But since we knew we'd be taking
care of it ourselves, we never had the disasters we've seen in
ponds built by landscapers and contractors. All
of the filter systems we avoid are expensive, some of them keep
the ponds clear. Ponds have become big business.
Everybody wants a piece of the pie, but bad builders are here
today, gone tomorrow, when you need them most.
Everything Fishy is an aquatic design, construction and
maintenance company. Everything Fishy would love
to design or re-design the landscape around your pond, choosing
plants suited to soil conditions, weather, and
those that won't litter the pond with debris. Ask us about our
landscape services in the Dallas-Fort Worth (Texas)
area. 817-293-1782. We also do consulting for do-it-yourself
pond and landscape customers. Pond
photos.
Design flaws to avoid
Unsealed concrete, mortar, concrete "cinder blocks" holding plants
up. On exposure to pond bacteria and
carbon dioxide from fish and bacteria, all of these leach
carbonates and lime into the pond, feeding very tough algae
problems.
Concrete, mortar, etc. sealed with exterior all-weather caulk that
leaks traces of chemicals when exposed to pond bacteria. Can
prevent the biological filter from becoming established. The only
pond I've seen that wouldn't cycle had a beautiful mortared falls,
with the mortar carefully covered by 20 year caulk. I highly
recommend aquarium silicone, polyurethane or fiberglass as a
sealant, or our X3 Sealant available on the Pond Wholesale page.
(cannot be ordered online, but shipping is available.)
Concrete or mortar must be thoroughly cured before any sealant can
be applied.. (the polyurethane must cure for a month before safe
exposure to water, fiberglass can be difficult and irritating to
work with.)
|
Aquatics information, photographs, articles
Copyright © 1999 - 2018 by Alice Burkhart, All Rights Reserved.
July 2000, before the upper plant basin, rockwork
redesign, and while the falls still leaked a bit.